Search

Joshua George Photography

A glimpse into my view

Category

adobe

Some of my Card

Here are my images I have constructed for one of my ideas for my FMP I think I may use this idea as I really like how it connects to communication within the was the images are disguised as sensory cards  informing the viewer what it is within the image displayed within them and within the way the idea has a range of different techniques within them allowing me to have a free rein over how I want to take / design my cards.

confused

I started my image above by first creating  my photo of the girl within a confused state of mind by having my model stand in the middle of a set up studio with a gel light that was projecting orange light upon her. I then took the image on a slow shutter of 10 seconds while she moved her head to add a sense of blurriness and confusion within the image.  After this I then placed the image into camera raw were I manipulated the image and removed the blemishes within the background. Once I was happy with my editing I decided to place it into inDesign to finish off turning it into a card by first  making a square template to make the sides even to the eye. I then used the square tool to make a square that covered the background within this square I placed the colour black to form the background. I then used the frame tool to place in the image of the confused girl into the black background within a square frame, I also placed a pink box under the image using the shape tool for the text and to capture the eye. I then decided to add texture to the box at the bottom by using the polygon tool to add these shapes multiple times within the pink box I then decided to manipulate the ankers within this shapes using the pen tool and the direct selection tool to change the shape of the objects making them more modern to the eye. The thing I like about this cards the way the colours complement each other and the way the lines and shapes make the eyes travel towards the main image within the card. doggienewformat

I also tried making a very simple design when making my cards as I wanted to see how this would change my images point of view. I found the image to stand out more to the writing and the writing  looked less distracting to the eye without objects around it but I decided against this option as I thought it was too simple for my idea and I thought it didn’t express my ideas too much, as I wanted the viewer to have to search within the piece looking for an answer to their questions showing my message of communication and dis-communication within the card.


frindship

For my next image I decided to use the same format but to change some elements within adding two lines within the piece framing the writing  and by making the text smaller , changing the colour and more connected to the background. I also looked at changing the sizes of the lines to change the way the eyes would engage with the image by making the top line bigger then the bottom one and slightly off from each other to attract the eye inwards to the text.

seaworld

For this image I decided to make it related to sea life as I wanted a variety within my images and I also wanted something that would standout from my other cards. I also wanted my image to hide different meanings within it like lonesomeness, feeling blue and hard to talk to but I wanted it to be something the viewer had to find / express for themselves. When creating this image I decided to use the shapes tool to make a pattern within the box below the image to hide the text and to confuse the viewer to make them search for a message that would relate to the image but wouldn’t help them to explain what it was as they needed to find it out for themselves.

travle

when doing this image I wanted to show movement and travel within the image and within the card so I decided to use my image of my double exposure to show movement giving the viewer the ideas they were on a journey. I also decided to make a complicated and missed up text box below using shapes and lines to give the feeling of confusion and chaos to the viewer. I think I have done well within this image above as I feel it draws in the viewer with its different textures and feel of atmosphere within certain parts.

Mags experiment

To find my skills within inDesign I decided to uses a number of different magazine covers to replicate within my own image to gain my ideas on how to create my own cover within my own magazine.

ec4446fc.jpg

I decided to use the GQ British fashion magazine  to start with as I wanted to first try something that showed some form of similarity within the writing to start with.

Screen Shot 2017-02-08 at 15.22.42.png

I started creating this by placing in one of my own images that looked simpler to the original image. I then decided to place down a grid by going to insert create grid to form a grid for me to work with. After this I then  decided to add the logo by placing a text box within the left top side corner then placing GQ within it and increasing its size , changing its font and colour to make it like the original.

After this I then added in the text by placing in the text boxes in the left and right sides of the magazine cover and filling them with text from the original magazine that I copied in. I think I have done well within this in capturing a close  similarity with the original magazine cover as I think I have done well within positioning the text and with finding simuler font.   Jack-OConnell-Hunger-Magazine-2016-Cover-800x1042.jpg

My second cover was from the magazine hunger as I wanted a simplistic image to give me an ideas on how to arrange my covers within a simplistic manner that would internet my viewers.

Screen Shot 2017-02-06 at 11.47.10.png

I started copying this by creating the background within inDesign by using the rectangle tool to make a square to cover the whole of the background I then changed the colour of this to a light hue of pink. After this I then decided to place a grid on top of the page to help me arrange my text and imagery within my own cover. I started this by finding one of my images that I thought would suit the type of cover and then placing it within the center of my page using the grid I had just made to help me arrange it in the center. After this i then placed the title within the cover by finding a font that was similar to the one in the cover i was copying. I went for a Sans font in the end as I felt this was bold and more like the text within the original magazine cover within shape and texture. I then decided up the size of the title and  to reorganize it to fit with the original.After this I then placed the text within the cover using text boxes and arranging it using the grid.


Unknown.jpeg

This is my seconded hunger magazine cover I recreated using inDesign .

Screen Shot 2017-02-08 at 15.21.11.png

I decided to use my image from  Audley End as I thought this looked more like the image on the front cover of Hunger and I also liked the way his facial features were acting within the photo. I started this image by first making a grid then placing the a box around the whole of the page and inserting the image creating a background. After this I then decided to work on the title by using the pen tool to draw on the words and the manipulating the words with the selection arrow to make them look more artistic. I then added lines under the writing to make the image look as if it was paint dribbled. I think I can improve within my cover by working more within the title as I think it looks untidy to the eye and I think I need to paint the letters by hand then scan them in to make them look more life-like.

images-1.jpeg

I decided to copy the Vogue Paris cover as I liked their design compared to the British version.

Screen Shot 2017-02-06 at 12.23.23.png

I started to replicate the original by first placing my photo I thought looked most like the original  within the background  then placing a grid on top to help place my text within my cover.I then decided to place the title within the cover by making a text box with the top of the cover then placing the words Vogue . I then increased its size and changed its colour and font to one that represented the original. after this I then made the Paris by drawing a small text box within the O of the Vogue and writing Paris, after this I then changed the font to an old style and the colour. After this I then started to add in the text by inserting text boxes within may cover then placing text from the original cover within them and placing them within the right arrangement of the cover.  After this I then manipulate the text by changing its arrangement,size,font type and colour.  To finish this off i placed a box within the corner and placed a bar code to make it look real.


images.jpeg

With this cover I decided to go for a simple cover as I wanted another cover that expressed how you can create a cover in a manner that is simple but recognizable to the public.

Screen Shot 2017-02-08 at 15.16.00.png

I did this by making a A4 page in a landscape layout, then placing a box over the whole of the background and inserting one of my image of a man. After this I created the title by placing a line horizontally down the page I then used the text box tool to stick to the surface of the line allowing me to type horizontal down the page the I-D. I then made sure the text was the right shape size ,font and placed it to match the original. I think I have done well within this by getting it very powerful within the way the image looks at you and the way the text is entered identical to the original.

!BpI1Np!!Wk~$(KGrHqYOKi4Eub(TrSnzBLqJhO47+g~~_35.GIF

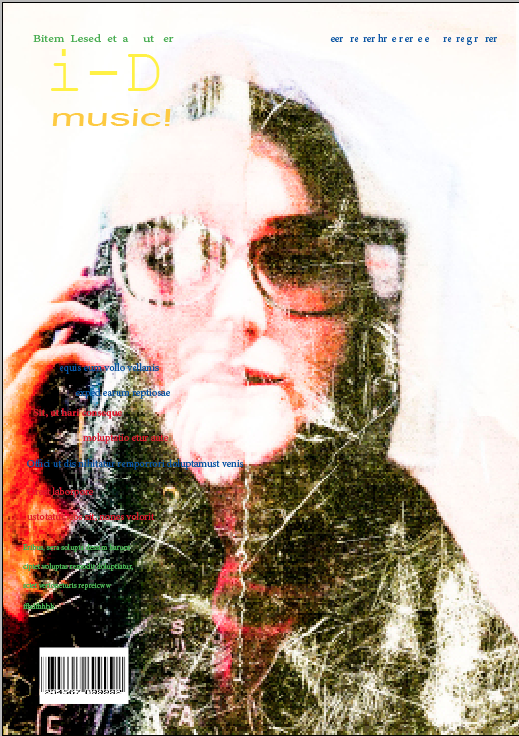
For my last cover to copy I decided to copy a very artistic cover from I-D as I wanted to gain some idea on how to form a more art based cover then just a photography based cover.

Screen Shot 2017-02-08 at 15.24.17.png

I first started this cover by first placing the image over the whole of the cover I then placed  the grid on top as I decided to use this to help within arranging my text within my design.

After this I then made the title by placing the text box in the top hand corner and placing the words I-D and changing its font face,colour and size to fit the same as the originals. I then turned my attention to text and how to lay this out within my own make by placing the text boxes within the layout of the cover and then placing text from the original within it. I also tried to do the  curve writing within the original but I struggled to make this as I  couldn’t figure out it at the time how to turn the text but I did manage to find out this latter on within a later cover.  I finished this off by creating a bar code within the left hand corner by inserting an image of one from the internet then resizing it to fit the size of the layout of my cover.


How to arrange images within inDesign.

Screen Shot 2017-02-24 at 13.23.03.pngThis is the tool used to arrange text around images within inDesign you use this by selecting an  image then getting the tool up within the windows bar and using the arrows to move the text around the image.

Screen Shot 2017-02-24 at 11.23.07.png

I started practicing this by making a square using the rectangle tool within the center. I then placed a text box within the whole of the page and filled it with placeholder text. After this I then used the text wrap to adjust the square and to mess around with the positioning.

Screen Shot 2017-02-24 at 11.25.13.png

after this I then tried this on a circular shape to see what would happen. by placing a text box over the whole of the page as before and then placing a circle in the middle using the circle shape tool. I then used the circular text wrap to make a circle border around the circle from the text.

Screen Shot 2017-02-24 at 11.32.00.png

after trying out the text wrap with shapes I then decided to try this onto a real image by inserting an image without a background within a page of text that I had placed down like before. I then selected the image and went to the text wrap and changed the type button to detect edges so the image would be selected instead of the outside. I then used the selection arrow and the pen to manipulate the anchors within the border pushing out the text. Screen Shot 2017-02-24 at 11.38.35.pngScreen Shot 2017-02-24 at 11.47.45.png

I made the text in the unusual text box above by using the pen tool to form an uneven shape  near the image making sure all of the lines were connected. I then selected it and inserted placeholder text within it turning it in to a text box.

Screen Shot 2017-02-24 at 11.50.15.png

After this I decided to move some of the anchor within the shape by using the selection arrow to move anchor manipulating the shape of the layout of the text and I also decided to remove some of the anchor by selecting them and pressing the delete button changing its shape.

The final album covers

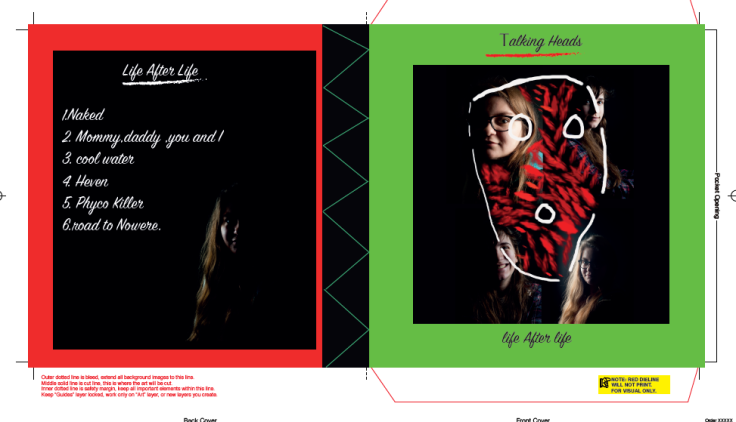
I created the album covers with a partner within the class she made one of the covers and I crated the other splitting the work load by half. We discussed and designed the covers together.

Screen Shot 2017-01-23 at 14.16.50.png

This was my partners  cover above inspired by  the covers of Joanna Newsom.

created by Kirstie Mather Screen Shot 2017-01-23 at 14.16.58.png

This was my cover inspired by the 80s and the talking heads albums.

created by Joshua Tweddell

Oil back covers

I decided for my back cover for my album covers to make something like an oil lamp design to show a theme of the 80s within my work. I did this by using a plastic bowl and a lot of different dyes that were coloured Red,green and black to colour the water to the eye. I then used oil to make bubbles within the water and to make the surface look oily and slimy to the eye. after I was happy with the texture of the water I then took the image with a flash and a 50mm lens.

These are my final images that I have edited.

_ro15320

I decided to edit this in camera raw as I wanted to escalate the amount of saturation within the colour and I also wanted to resort the levels to make the image look darker and the highlights look lees sharper to the eye.

backcover-ideas

For this image I decided to make it a close up as I wanted to show one bubble within the image and a range of complementary colours around the center.

How to use Adobe illustrator

Adobe Illustrator is a type of editing software that is used to edit images and text it is mostly used within graphic design as it is easier to manipulate text within the software.

screen-shot-2016-12-02-at-13-12-03The tools within illustrator are mostly the same as Photoshop or any other adobe editing software due to them all being built with the same sort of build but there is some expectations with the arrow tools as this would not be found within Photoshop this are for moving  your works and for reorganizing anchors within text and imagery.

Screen Shot 2016-12-09 at 13.59.43.png
tool bar
Screen Shot 2016-12-09 at 13.58.21.png
This tools are used to place the image into bridge and Photoshop so you can use different software instead of just illustrator.


screen-shot-2016-12-02-at-13-12-34
This is a grid I created this by pressing the grid button within the program.
screen-shot-2016-12-02-at-13-17-00
text box used to insert text within your work.
screen-shot-2016-12-02-at-13-16-33
Line tool used to create a line within your work
screen-shot-2016-12-02-at-13-17-15
This is the layout of the textbox you create this by clicking on the text box tool and then dragging it across the page to create a text box.
screen-shot-2016-12-02-at-13-17-41
Direct selection tool
screen-shot-2016-12-02-at-13-17-48
Anchor used to manipulate objects and text.
screen-shot-2016-12-02-at-13-44-01
This is the layout of the page when you open the document.
screen-shot-2016-12-02-at-13-44-51
The navigate this is used to look at small details within the images.

Blog at WordPress.com.

Up ↑